
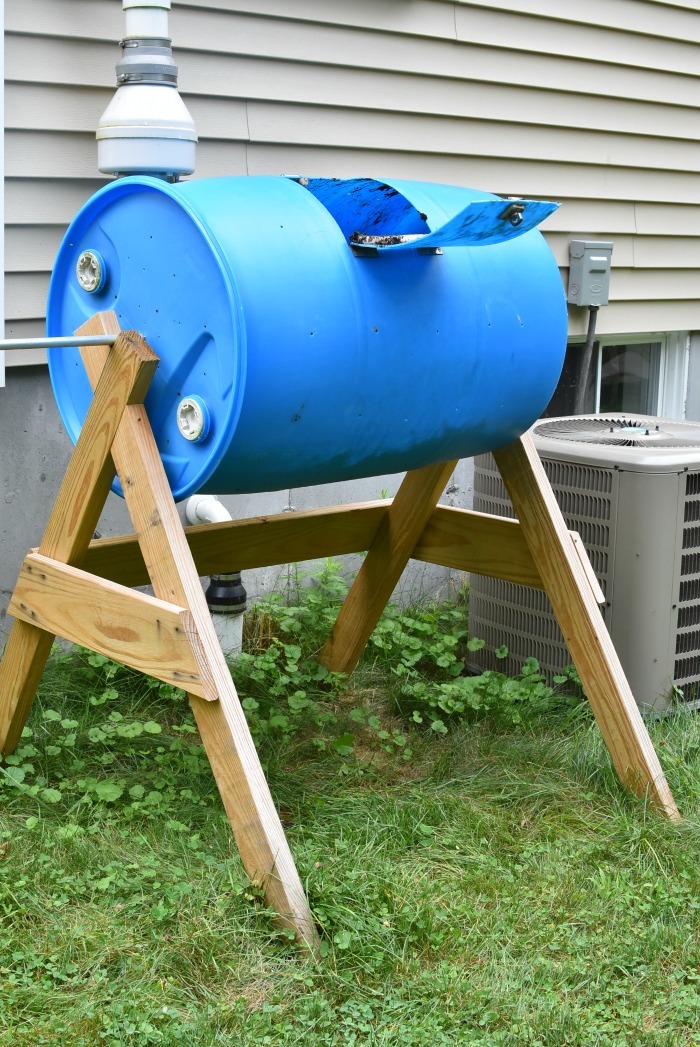
Making your own compost is an easy process to learn, and it should be cheap to get started. Unfortunately, most decent-size compost bins on the market will cost you over $50. That's why I'm going to show you how to make a cheap DIY compost bin that actually works! This compost bin is a tumbler, so it makes the composting process easier too.
This post contains affiliate links. As an Amazon Affiliate, I earn on qualifying purchases. All views expressed are my own.
What is Compost Anyway?
Compost is a soil amendment consisting of organic material that has undergone a process of biodegradation called composting. Finished compost has a deep black color and earthy aroma. It is rich with bioavailable nutrients that plants can use to grow strong and healthy.
Compost Bin Design
When making your own compost bin, you first need to consider the overall design options. The 2 best options for DIY bins are storage totes or plastic drums.
Since both of these items are already designed to hold things, they happen to work really well for compost.
The best option is a 55 gallon plastic drum. These are ideal for making compost because with only slight modifications, you can turn one into a tumbler. This is what I'll be focusing this post on. If you want less of a challenge, you can check out this post on making a compost bin from a storage tote.
You see, compost needs to be turned/mixed on a regular basis in order to maintain an active pile. If you convert a drum into a tumbler, all you need to do is rotate the drum once everyday or so. If you choose a tote, you will have to turn your pile using a garden hoe, pitch fork, or shovel.
Where to Find Plastic Drums for Composting
If you do a bit of searching it's possible to find a used 55 gallon plastic drum for free (or very cheap).
Plastic drums are used to transport and store a variety of different chemicals. Many manufacturing companies consume these chemicals in their process(es) and in some cases have no use for the empty plastic drums.
NOTE: Do not use a plastic drum that previously contained a hazardous or unknown chemical. You want to be fully aware of the previous contents and if they are harmful to the environment or your health.
I got my plastic drum from the company I worked for. It previously contained 70% isopropyl alcohol (IPA), which we used for sanitizing our cleanrooms. Once the drum was almost empty, I allowed the remaining alcohol to evaporate and then rinsed the inside of the drum with water.
Another place to find used plastic drums that are safe to use for compost are pickling companies. They go through a bunch of drums and will sometimes give them away for free (or at a very reasonable price).
Supplies & Tools Needed
Some of the tools in the list below should be part of your home tools collection already, but if not I provided Amazon (affiliate) links to highly rated tools if you need to purchase.
- 55 Gallon Plastic Drum
- Two (2) 2x4x8 Pressure Treated Boards
- One (1) 1x6x8 Pressure Treated Board
- 3" long Stainless Steel or Galvanized Deck Screws
- 2" long Stainless Steel or Galvanized Deck Screws
- ½" x 8' Galvanized Metal Electrical Conduit
- ½"x½"x6' HDPE, UHMWPE, or similar plastic
- ⅝" or ¾" long Stainless Steel or Galvanized Deck Screws
- Two (2) stainless steel butt hinges (or 1 piano hinge at least 8" long)
- One (1) stainless steel or zinc plated latch
- Miter Saw or Circular Hand Saw
- Hand drill and bits
- Reciprocating saw or jigsaw
Cut List (Frame and Axle)
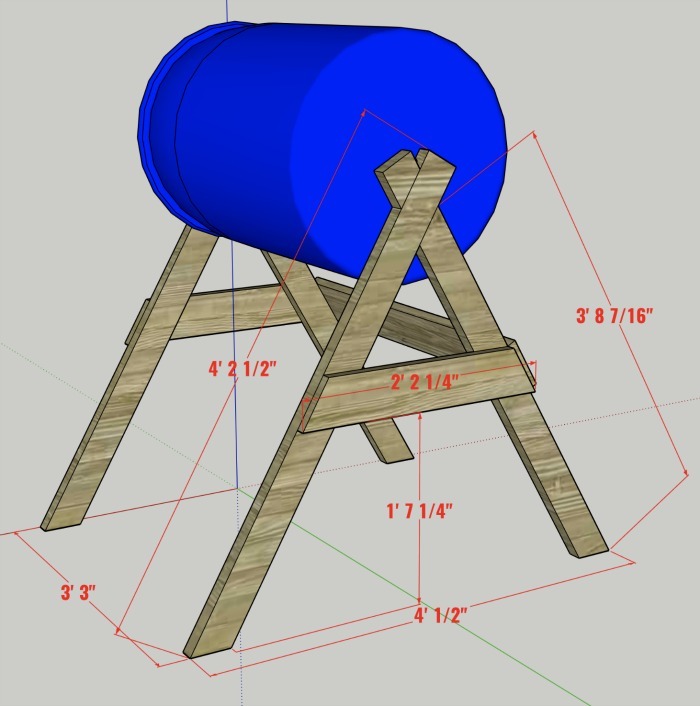
- Two (2) 2x4's cut to 4' 2-½", one end cut at 30° inside miter
- Two (2) 2x4's cut to 3' 8-7/16", both ends with 30° inside miters angled toward each other.
- Two (2) 2x4's cut to 4", one end cut at 30° inside miter
- Two (2) 1x6's cut to 2' 2-5/16" with 30° inside miders at each end
- One (1) 1x6 cut to 3' 3" long
- ½" Galvanized metal conduit cut to 3' 5" long
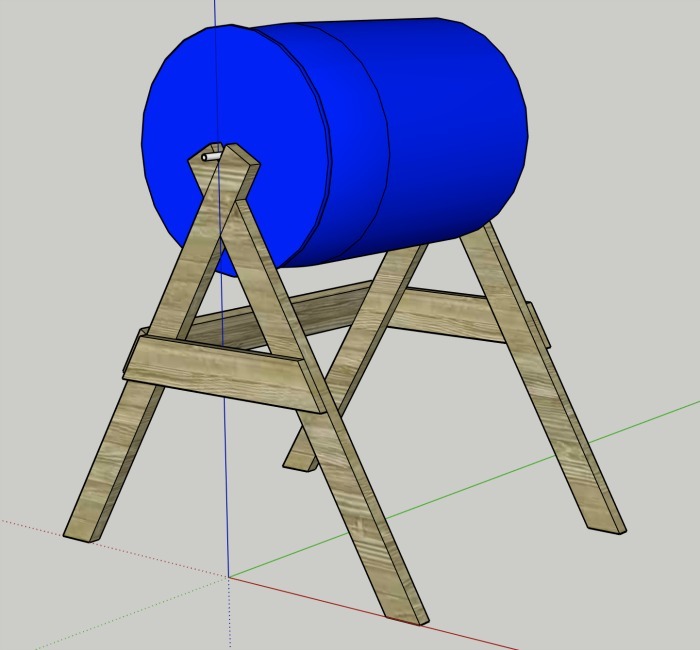
Build the Compost Tumbler Frame
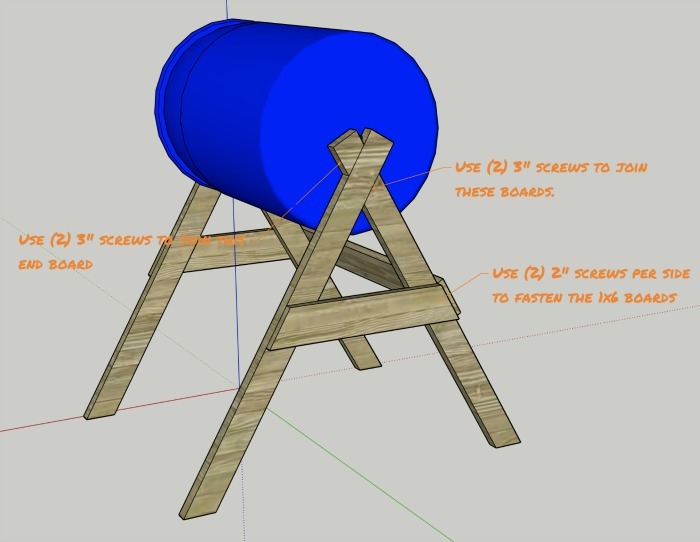
Assemble the 2x4 boards from the cut list using the 3" long screws. If you have a pocket hole jig, this is the best way to go. If not, just pre-drill pocket holes by eye...
Making the Tumbler's Hatch Door
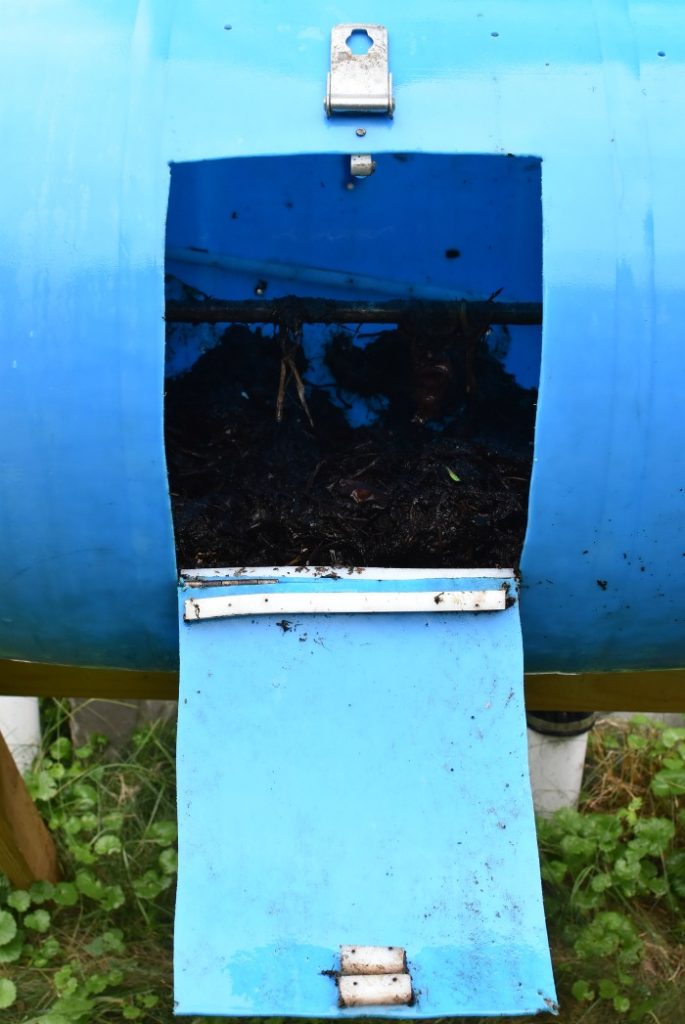
The drum needs to have a door cut into its side that will allow you to add and remove materials.
- Pick a location mid way along the side of the drum.
- Mark a 12"x12" square to be cut out with a Sharpie or similar marking device.
- Layout the location of the hinges by eye along one of the axial (parallel to the length of the drum) sides of the marked square. Mark the hole locations with a Sharpie.
- Layout the location of the latch on the opposite end of the hinge. Mark the hole locations with a Sharpie.
- Pre-drill the hinge and latch holes you just marked using a ⅛" drill bit.
- Drill ⅜" holes in each of the 4 corners of the marked square.
- Using a reciprocating saw or jigsaw, cut out the square of plastic and place it aside.
Assembling the Hatch Door
The plastic drum's wall is thin (about 3/16" thick), so you can't screw directly into it and expect the screws to hold. There are 2 different ways to ensure the screws will be secured long term - use machine screws and nuts or use the ½" square HDPE plastic as reinforcement.
I used the ½" plastic because it also serves as an "agitator" to help tumble the compost. (We will use more of it later for the opposite end of the drum too.)
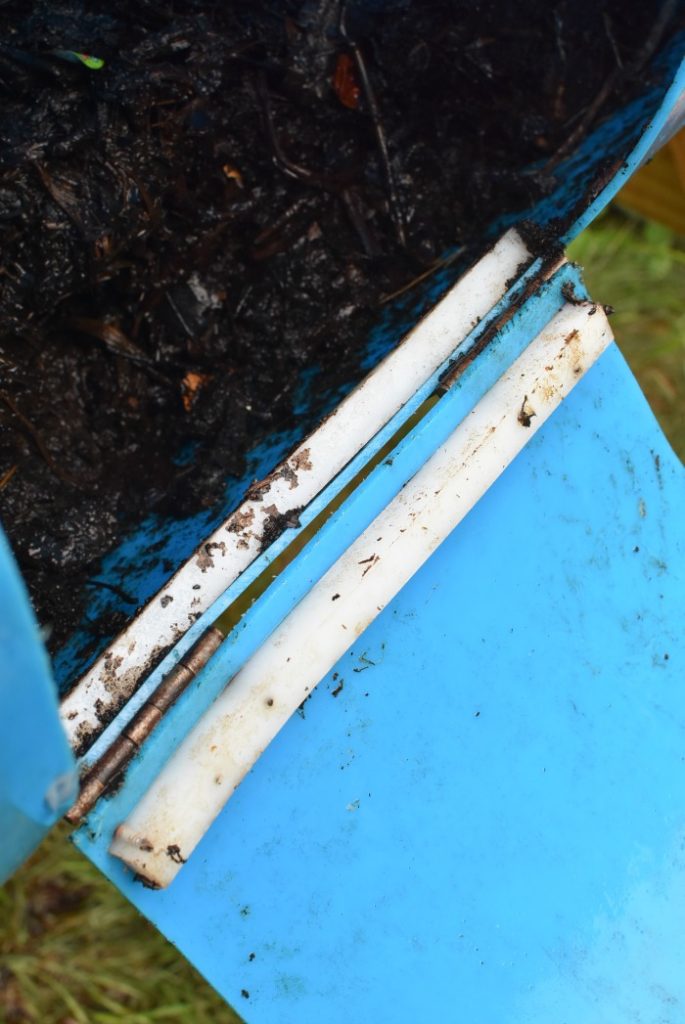
- For each hinge, cut 2 pieces of ½" plastic to the length of the hinge.
- Pre-drill ⅛" holes into the plastic that align with the hinge holes.
- Install the hinge to the drum by screwing through the hinge, then the drum, and finally into the plastic which is located inside the drum.
- The drum wall should be "sandwiched" between the hinge on the outside and the ½" plastic on the inside.
- Repeat steps 1-4 for the latch.
You should now have a hatch style door that can be opened and closed. The latch should be able to keep the door closed during tumbling operations.

Prepare the Axle
The axle is ½" galvanized steel electrical conduit. It's cheap, easy to find, and easy to cut.
- Cut the ½" conduit to a length of at least 35". Longer is okay, but shorter will risk the tumbler "tumbling" off its axis if the conduit migrates out of the frame!
- On the plastic drum, drill a ⅝" hole in the center of each end.
- Pass the ½" conduit through the holes until it sticks out evenly at each end.
Assemble the Tumbler and Drill Aeration Holes
It's finally time to assemble the tumbler together and drill holes in the drum to allow airflow in and out. Sufficient airflow is important to allow rain and air to enter and drain out of the drum.
Compost that is too dry will not activate the microorganisms to the extent that they rapidly breakdown the waste. Compost that is too wet, will hinder aerobic bacteria (bacteria that requires oxygen to survive) from thriving, and instead promote anaerobic bacterial (bacterial that thrives in the absence of oxygen) growth.
Both types of bacterial will break down waste, but anaerobic bacteria tend to stink!
- Lift the drum with the axle installed and place it on the frame.
- Using a ⅜" (or similar size) drill holes around the round side and ends of the drum.
- Space holes 2-3 inches apart.
Add a Plastic Tumble Fin
At this point the compost tumbler can hold food and yard waste, rotate on its axis, and has a functioning door. While this is all good and well, you will notice that the inside of the drum is pretty smooth. Because of this, when you rotate the drum, the compost will just stay at the bottom and not mix well. The inside wall will just keep sliding under the compost without it moving.
To combat this, you need to add something to help "tumble" the compost... just like the inside of a clothes dryer!
I had some ½" square HDPE plastic bar laying around that I used, but you could use anything that you can get inside the drum and fasten to the inside wall.
Once the compost tumbler is finished, you can start using it!
How to Make Compost
Compost is made by combining organic materials and water (traditionally in a pile) to induce rapid biodegradation.
The organic materials are divided into 2 categories:
- Browns - dry leaves, dry grass clippings, dry wood chips or twigs, paper, cardboard, etc...
- Greens - fresh grass clippings, vegetable scraps, fruit scraps, coffee grounds, etc...
The ideal batch of compost consists of roughly 60% browns plus 40% greens and just enough water to keep it moist, but not dripping wet.
How to Use the Compost Tumbler
You can add things like the following to your DIY compost tumbler:
- Grass clippings
- Vegetable scraps
- Fruit scraps
- Coffee grounds
- Paper coffee filters
- Shredded paper
- Dried leaves
- Egg shells
- Saw Dust
- Small Wood Chips
After you add scraps, give it a few rotations to tumble it all together. Once it's full, tumble it every few days to keep the compost mixed.
I designed the height of the tumbler to allow a wheelbarrow to fit under it. Once your compost is finished, you can place a wheelbarrow under it, open the door, and rotate the opening so the compost can be dumped/scraped into the wheelbarrow.
How to Tell if Compost is Done
Your compost is ready to use when you can no longer recognize any of the waste you added to it. You may see some wood chips or twigs if you added those, but the vast majority of waste should not be discernible.
Finished compost should have an "earthy" smell and be rich black in color. It should be finely mixed and the pieces consistent in size.
Add your finished compost to your garden and give your plants a boost of beneficial microorganisms and nutrients.

[…] clippings are some of the best natural fertilizer for your lawn. They naturally decompose into compost and make a great soil amendment. Why collect grass clippings, when they can replenish vital […]